Wem Dominator 25 valve guitar Amplifier Restoration
This Wem Dominator 25 PC board is in a terrible condition
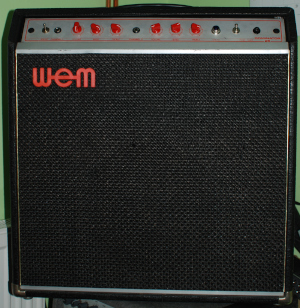
Assessing the Amps Current Condition
This is my latest valve guitar amplifier restoration project. A Wem Dominator 25. Having got back in to restoring and repairing vintage amplifiers in the last year I could not let the chance of owning this classic amplifier pass me by. I bought it from a cash trader shop. It was in a terrible state although it did just about run when I brought it up on the variac. But a bad El84 and the very leaky main caps were the least of this amp’s problems. The amp in its 40 odd year life looked inside like it had consumed 20 cigarettes a day. The pc board, the chassis and all the wiring were coated in gunk and what looked like oil sprayed all over them as you can see in the pictures. I had not bargained for this mess when I took the back off. This was going to be a big restoration project.
Wem Dominator 25 Specs
The Wem Dominator 25 is an 18-watt valve amplifier using two EL84 valves for the output stage. The amp has two separate channels, and both appear to be identical. With three ECC83 valves, one for each channel and one for the phase invertor this amp really kicks ass and has that great British valve tone. A Celestion 20-watt Greenback fitted in this amp. The Greenback is a classic speaker and was used in Marshall amplifiers in the 60s and 70s.
The date of this amp’s manufacture is 1977 or 78. The codes on the CTS pots say 1978 if they are indeed the dates. The date code on the speaker is Feb 1977.
The Restoration
When working on vintage valve amplifiers there is always the argument on how original you leave the amp after a repair. Some people want to leave every possible component in the amp that still works even when the life left in those components may be short. The main parts in all valve amps are the transformers and these seem to go forever if they are well fused, and the amp has not been placed in a damp environment for long periods of time. So, the transformers will stay. The rest of the components including the preamp valve sockets which are mounted on the pc board will go.
What About the Component Board?
Valve guitar amps will have a turret or eyelet board or a pc board or will be wired point to point. This amp has a pc board and what a mess! It was coated with a layer of gunk and what looked like penetrating oil, but it clearly wasn't on close inspection. I tried to clean the edge of the pc board, but this layer of gunk would not budge. I have restored two Wem Dominators previously and one thing I always do is strip all the components on the board and replace them with metal film resistors and new caps. I can hear the purists wincing! At the end of the day I am a player and I need an amp to be reliable. Whether you like metal film or carbon resistors is an argument for the forums and not here. I choose metal film resistors because to me they seem to be more accurate in value and don't seem to drift as much. So, it's a complete strip down. Once I had all the capacitors and resistors out this very sorry looking pc board, I started to look for something to clean off this layer of doom. The only thing I found that would shift it and not destroy the board was White Spirit. Once I had removed all the gunk from the board it was time to turn my attention to the chassis.
Cleaning up the Chassis
If you look at the pictures of the chassis before it was cleaned, you can see where I have removed the output valve sockets. It shows how filthy this chassis was. The chassis is made from Aluminium. The white spirit lifted the layer and I used the good old Autosol to give it a bit of a polish, but the Aluminium was quite tarnished in places but all in all it came out quite well considering it's over 40 years old.


Putting it All Back Together
Time to put it all back together. This part of the restoration is always the most satisfying seeing it slowly coming back to life as you add more and more new parts.
Adding the New Components in the PC Board
Adding resistors and capacitors to a pc board is a fiddly job at the best of times. Another argument that pops up when you mention replacing capacitors in any valve amplifier is the type of caps that you use. But again, this an argument for the online forums. I can't comment on more high end capacitors because I have never used them. What I will say is that to my ears the Mullard caps that I removed from this amp don't sound any better than the new Polyester film ones that I have replaced them with. I also used some Silver Mica caps for the Picofarad values.
Building Up the Chassis
I replaced all the wiring. The secondary feed wires for the HT had been badly burned with a soldering iron, so I clipped them back and extended them with new wire and double shrink wrapped them to make them safe. Incidentally when I first opened the amp up one of the secondary feeds was disconnected probably due to some botch soldering. I also fused each side of the secondaries to protect them if ever the diodes should go dead short. See this post from The Valve Wizard website on fusing. This guy knows his stuff and offers good advice. The speaker wires from the transformer went through a grommet in the chassis. I noticed that a jack socket would fit perfectly in the grommet hole. So now the speaker can be unplugged, and the amp has the option to be used on an external cabinet.
The output valves in this amp were Mullard EL84s. One was arcing inside under load but the other one ran fine. When I tested the good one on the valve tester it came in at 83%! I had pulled Mullard valves out of the two previous Dominator Mk3s that I had restored and out of those 4 there was only one that was any good. Here is the lucky part. When I tested that one valve it came in at 84%. Close enough for Jazz. These old Mullards had as much life left in them as a pair of new EL84 valves! They went straight in the sockets. Two of the preamp valves tested good and I added another good one to make up the three. That old valve tester is saving me some dollar!
The Pilot Light Conundrum
The pilot light was a bit of a cheap neon 250 volter. It was also cracked and looked very unsafe to have mains voltage flowing through it. I couldn't find a neon light too fit in the faceplate. They were all to small. So, I added a 6.3-volt Fender Jewel light which feeds from the heater winding. This added and extra 150ma draw on the winding but that shouldn't be a problem.
Time to Fire it Up
With it all put back together it was time to bring it up on the variac. Will it run? It came up fine on the variac after bringing it up slowly. It didn't go bang! But it didn't all go smooth. Channel one was not working and after a bit of testing I discovered the anode voltage was missing on the ECC83. This turned out to be a broken track on the pc board which I hard wired to the pin of the valve socket. Sorted!
The chassis now finished it was time to get it back in the cabinet. You can see the completed chassis in the picture below.
What does it sound like?
This amp sounds amazing and is much quieter than a stock Dominator. It is also quite amazing how good a condition the cabinet is in considering how bad it was inside. The knobs that were on this amp were not original and a bit grubby so, I ordered some new ones to match the red writing on the faceplate. Some people may say there was too much work in this project and the amp was too far gone. I get the point there. But these old amps are becoming scarce and although it was a lot of work, I find it relaxing working old vintage amplifiers but then I don't do it every day as a job. And plugging in to a finished amp as a player gives me great satisfaction when I crank up the tone.
Thanks for stopping by and taking the time to read this post and check out the pictures below, before and after. And keep on rocking cos there is not many of us left.


Click the images to enlarge